Movie Recorder
Via includes many functionality to visualize MATSim simulation results in a time-dependent manner. In-stead of presenting a multitude of screenshots from different times, why not just show the evolving traffic patterns in an animation, as a movie? The Movie Recorder plugin allows to record movies of Via’s visualizations.
Table of contents
Creating Movies
Via offers two ways to create movies from its visualizations: Directly record what is shown by Via into a movie file, or first create a series of screenshots and encode those images afterwards into a movie file.
The recording of a movie will slow down Via notably, especially if a high-quality encoding is chosen. It is thus recommended to first only record a series of screenshots, and convert the images to a movie afterwards. This allows to run the movie-encoding on its own while not interacting with Via, and especially allows to re-encode the same image sequence into movies with different settings.
Recording a Movie
To record everything Via displays as a movie, press the Record Movie button in the toolbar or select Record Movie from the Tools menu. The movie recording process is started, and a movie with pre-set settings is created.
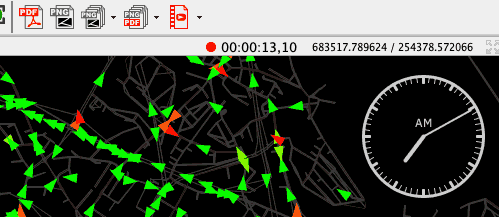
While Via is recording, the button in the toolbar changes to red. In addition, the play length of the resulting movie is shown in the title bar of the viewer area.
To stop the recording, just press the button in the toolbar again, or select Stop Recording Movie from the Tools menu. The final movie file will—by default—be stored in the directory of the Via executable, although this location can be changed in the program’s options.
Movie Settings
The format of the movie, the default location to store it and other options can be specified in the program’s options. Open Via’s Options (menu File > Options... on Windows and Linux, menu Via > Preferences... on macOS) and switch to the Movies tab.
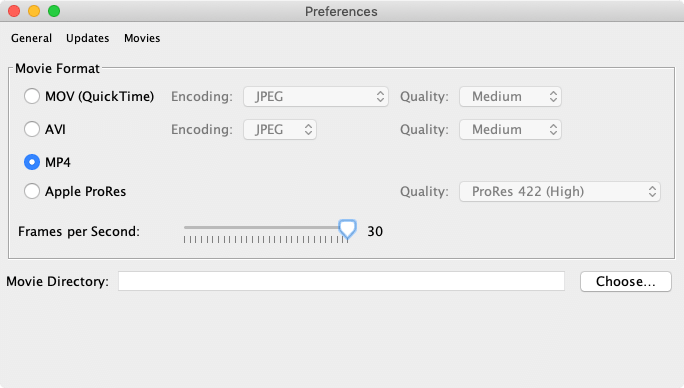
The available settings include a choice of the movie file format (see below for a detailed discussion of the different formats), the playback speed of the movie (frames per seconds), and the directory where the finished movie will be saved to. If the movie directory is empty, movie files will be stored in the directory of the Via executable.
Converting Images to a Movie
To convert a series of previously recorded screenshots into a movie, select menu Tools > Images to Movie.... A dialog as shown below appears.
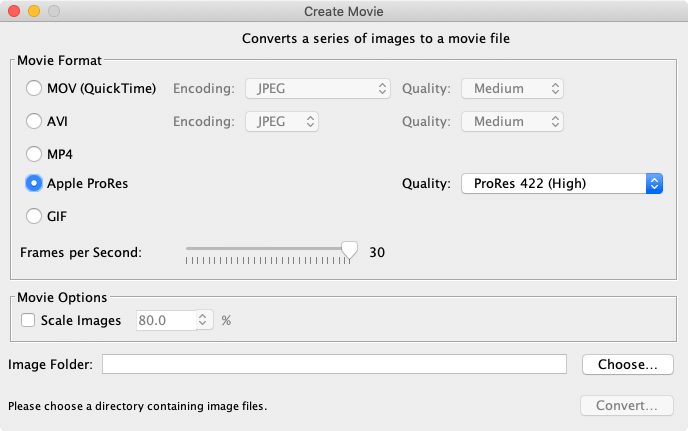
Select the desired encoding of the movie (see below for more details about the formats), and the number of frames per seconds. Next, choose a directory containing all the image files you want to convert into a movie. Alternatively, you can drag and drop a directory from your file system onto the dialog. Via analyzes the images and calculate the expected length of the resulting movie with the current settings.
Movie Formats
Via currently supports the following movie file formats:
- MOV A format traditionally used by Apple for its QuickTime software. Can nowadays also be played be Windows Media Player or other video player software.
- AVI A generic video file format which can be played by most software.
- MP4 Also known as H.264 or AVC (Advanced Video Codec), this is a modern video encoding, well supported by many software video players.
- GIF Animated GIFs are image files that contain more than one image and which are typically on top of each other, showing a new image every second or so. Being a rather old file format, it is well supported by Web browsers and presentation software, but produces rather large files and only support a limited number of colors.
- Apple ProRes This is a video encoding pushed by Apple, offering fast encoding and decoding combined with a high visual quality, but creating rather large video files. This format is mostly supported by video postprocessing tools like professional video editors and should only be used if postprocessing of the recorded Via video is planned.
MOV and AVI both support different encoding of the actual video frames, either as JPEG or as PNG. Apple ProRes supports four different quality profiles to encode the movie.
Which format should you use? Not all video players play all formats, not all presentation software supports embedding of all formats. So you have to try out which formats works best in your environment. The general recommendation nowadays is to use Apple ProRes if you plan to post-process the video recordings, and MP4 in all other cases. The following findings might help you decide upon a format for your needs:
- MP4 produces high-quality videos with acceptable file sizes, but the encoding is slow. MP4 files should be supported nowadays by most operating systems.
- MOV or AVI with PNG encoding produces high-quality videos with acceptable file sizes. Encoding is faster than MP4, but not all video players support this format.
- MOV or AVI with JPEG encoding allows one to specify the quality of the images, and has the fastest encoding. Depending on the chosen quality, the size of video files varies. Note that video files encoded with high-quality JPEG produces videos with a visual quality similar to MP4 or PNG-encoded MOV/AVI, but with a much bigger file size.
- Apple ProRes should be used if you plan to heavily post process the recorded animations and your video editing software supports the format.
If you work regularly with video files, it might be useful to look into dedicated video software to re-encode the generated video files with improved video codecs. They can often generate smaller video files with the same perceivable quality. Also, you might want to cut multiple videos using some video editing software to combine multiple recordings into one movie, add titles and transitions, to provide a full-fledged video for your audience.