Working with Layers
Table of contents
Creating Layers
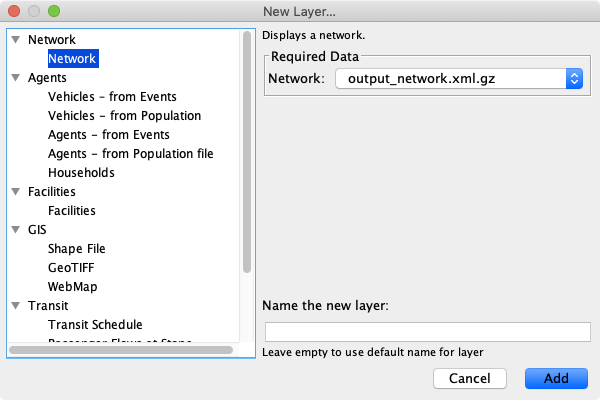
To create a new layer, make sure that the needed data is available and loaded into the application. Then, switch to the Layers Control and click the plus-button at the bottom of the panel, or choose File > Add Layer... from the menu.
Once a layer is created, it will appear in the list of layers, along with settings offered by the layer. Layers can by hidden by unticking the checkbox in front of the layer name. The order of the layers can be changed by clicking in the area next to the layer name and dragging the layer up or down in the list of all layers.
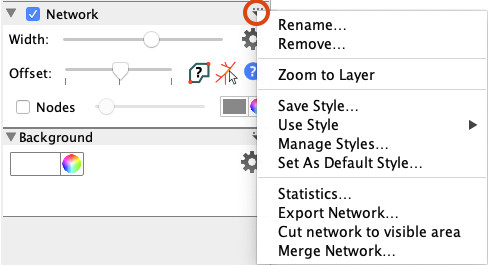
On the right end of the layer’s title bar, a triangle icon offers additional options to work with a layer in a popup. By default, options to rename or remove a layer are available. Certain layers provide additional functionality in this place as well, such as the network layer depicted.
Create Layers Automatically
The typical process to visualize some data consists of at least two steps: Add the necessary data file, then create a layer using this data to show something. This can be simplified by instructing Via to automatically create certain layers when specific kinds of data is loaded.
Switch to the Data Sources control (first button in the control section). At the bottom, you’ll see a little gear icon. Click on it and select Automatically Create Layers.... A dialog will open where you can select which layers should be automatically created.
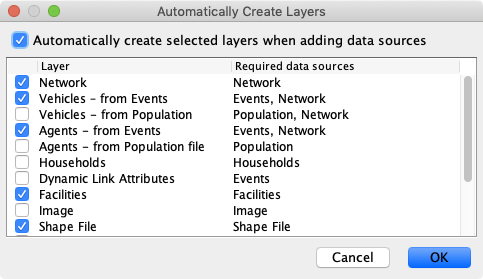
Please note that when you are adding multiple data files of the same type (e.g. multiple networks and multiple event files), Via might not create certain layers due to the ambiguity of which files to combine (e.g. which network and which events to create a Vehicles layer).
Layer Styles
Most layers include options to change the visual appearance of the shown data. This is great as depending on the zoom level, different settings might be helpful: Looking at a small detail of a road network, it might be desireable to have the links shown with a heavy stroke and some offset, but looking at the full network, a thin stroke and no offset often looks better. If you often change between two or more zoom levels, keeping track of all the right settings is very cumbersome. Styles help to store the state of the visualization options, so it is easy to switch between two or more visual setups with ease. Styles are saved in *.via files, so they can also be used to define presets to be used during a presentation, e.g. along with Views.
To access the styles option of a layer, open its option menu. If the layer supports styles, you’ll see the entries Save Style..., Use Style, Manage Styles..., Set As Default Style.... To save the current visualization options of this layer as a style, just select Save Style... and enter a name. The style will then appear in the sub-menu of Use Style, where it can be selected. If you have a corporate appearance, or prefer other defaults than Via’s developers, you can define your own default style for this layer by selecting Set As Default Style. Then, all new layers of this type will use your current settings.
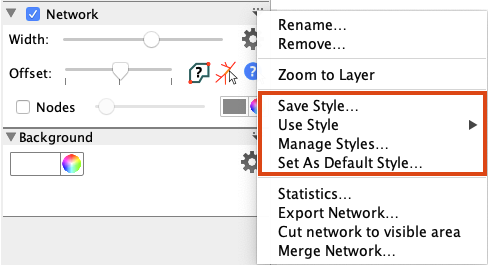
With Manage Styles... you can delete styles, restore the application default style, and define styles as being global. By default, styles are related to the current visualization, and are stored in *.via files. But if you want some styles available all the time, no matter what data you are visualizing, you can define those styles as global using the Manage Styles... dialog. A global style is stored locally with the applications options, so every time you start Via on this machine, the style will be available under Use Style.
To learn more about styles, have a look at the short webinar about Layer styles.